Fantastic work Majoris, I am looking to incorporate hopper into my cabinet, could you supply the link for the Cube hopper you mentioned?
Pete

There have been 32 items by WibbleWobble (Search limited from 02-May 14)
 Posted by
on 22 November 2018 - 12:33 PM
in
Cabinet Building
Posted by
on 22 November 2018 - 12:33 PM
in
Cabinet Building
Fantastic work Majoris, I am looking to incorporate hopper into my cabinet, could you supply the link for the Cube hopper you mentioned?
Pete
Posted by
on 22 November 2018 - 03:43 PM
in
Cabinet Building
I understand, I would appreciate if you could contact him and see if he would be willing to look at international postage.
I can see it might be too much for him, I do not know how expensive postal in Poland is but in UK it would be more than the hopper price.
Pete
Posted by
on 02 December 2018 - 05:25 PM
in
Cabinet Building
Hello Again Folks,
I have finally managed to make some more progress on the build, and have given the cabinet a couple of coats of paint and can now start to see it coming together which is great.

Hopefully a couple of weeks at home will allow me to make some further progress on this, as being away with work has really impacted progress.
I have also wired up my Pac-Drives and iPAC onto a board (inspired by the fabulous job Uptown47 made of his)

I have tested these and discovered that the seller has unfortunately sent me 2 x ID1 boards, so I am having to send one back for an exchange, which is a bit of a pain but not the end of the world.
I have also managed to make a start on the wiring of the buttons but have now run out of time for this weekend.

Hopefully further progress to report soon.
Pete
Posted by
on 04 November 2018 - 07:17 PM
in
Cabinet Building
Hi,
I made the image myself, it is just a series of layers, for the background and the text, if you are interested I can send you the PDF I used for printing them.
Pete
Posted by
on 04 November 2018 - 04:11 PM
in
Cabinet Building
Hi All,
Apologies for the lack of updates, a last minute urgent business trip to the Czech Republic has kind of got in the way of progress. However I have managed to make myself some inserts for the various buttons. I wanted something that was common across all the buttons. I found a very useful guide over on DAD's for adding multiple strokes within Photoshop and with a bit of playing I came up with the below:
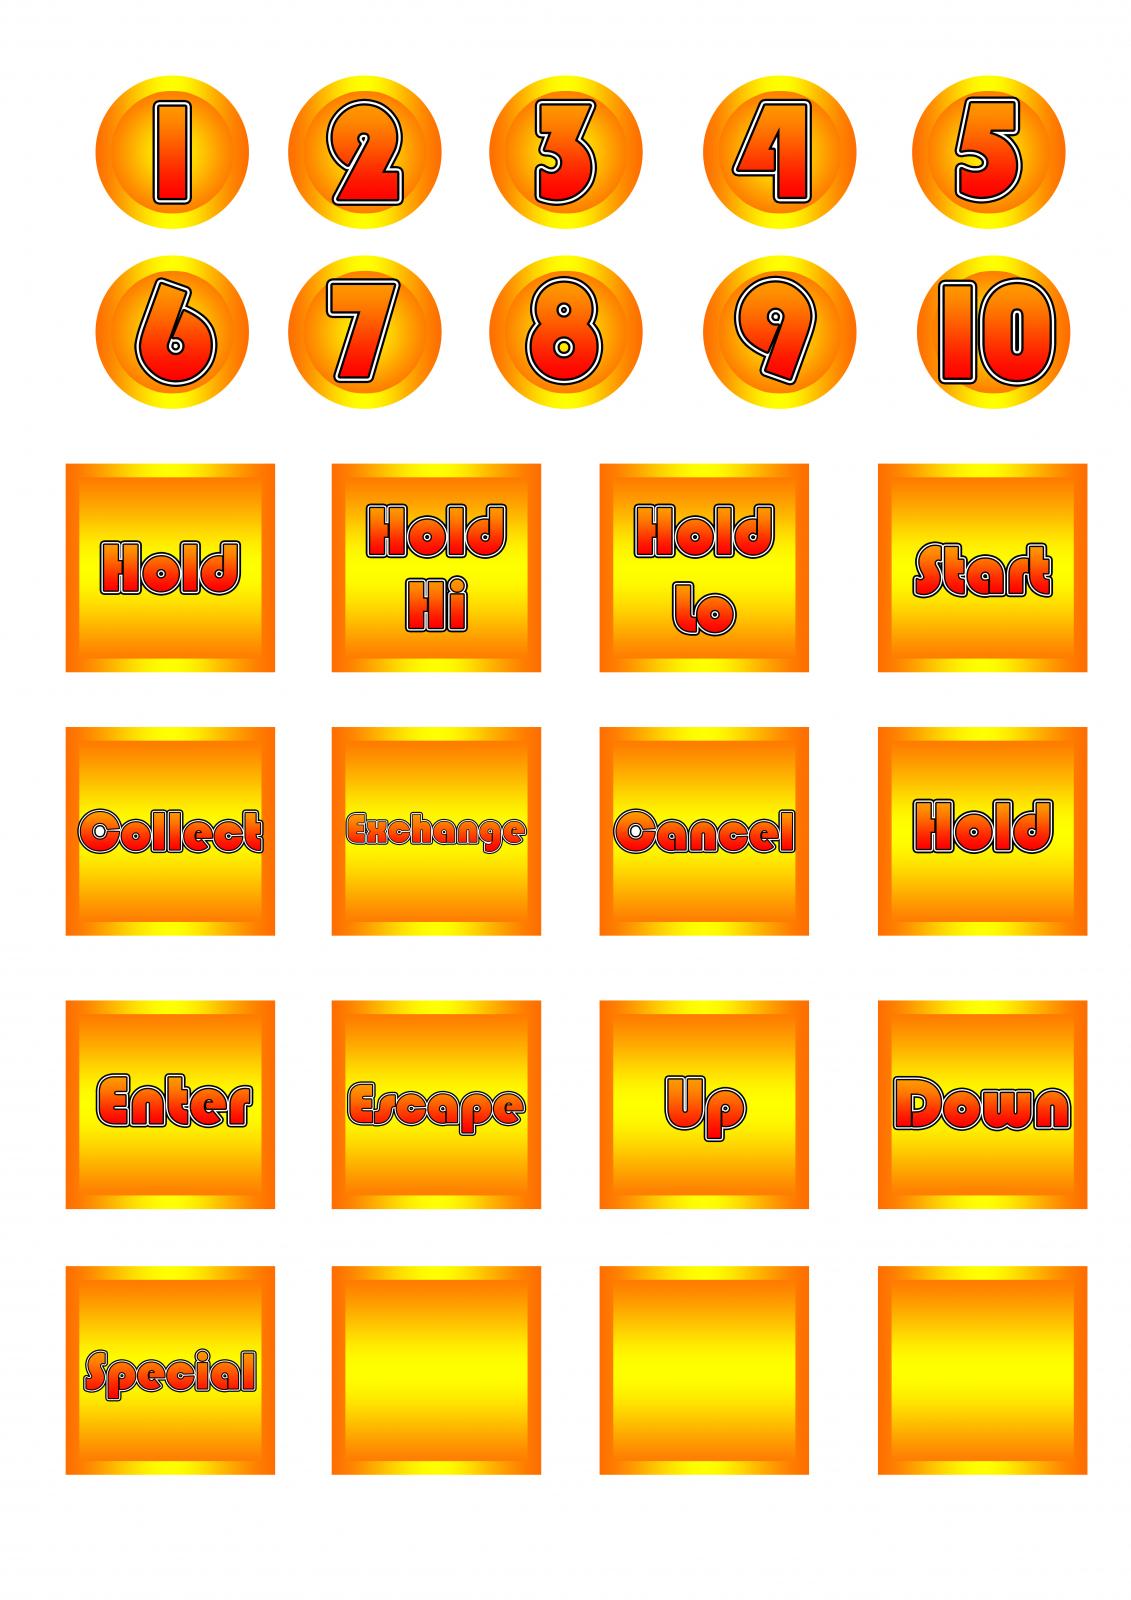
Which when fitted to the buttons look like:


Overall I think i'm pretty pleased with the look that they give. Hopefully will get some more time this week to work on the build.
Pete
Posted by
on 13 December 2018 - 08:20 PM
in
Cabinet Building
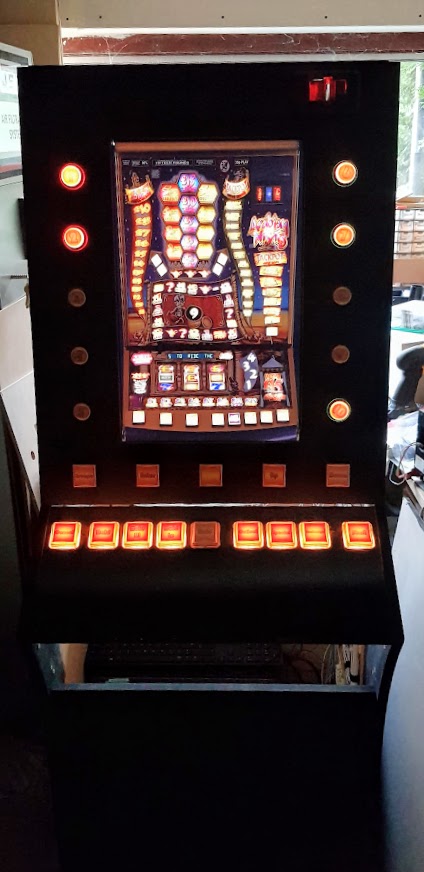
Hi Folks,
Managed to get a little bit more done on the cabinet, have managed to get all the buttons wired back to the Earth link and then all the data connections back to the iPac which means that all the buttons can now be tested.

As you can see I was getting confused as to which button was which so I ended up labeling them as when I started to configure the iPac I kept getting the buttons all mixed up ending up with some real weird results....

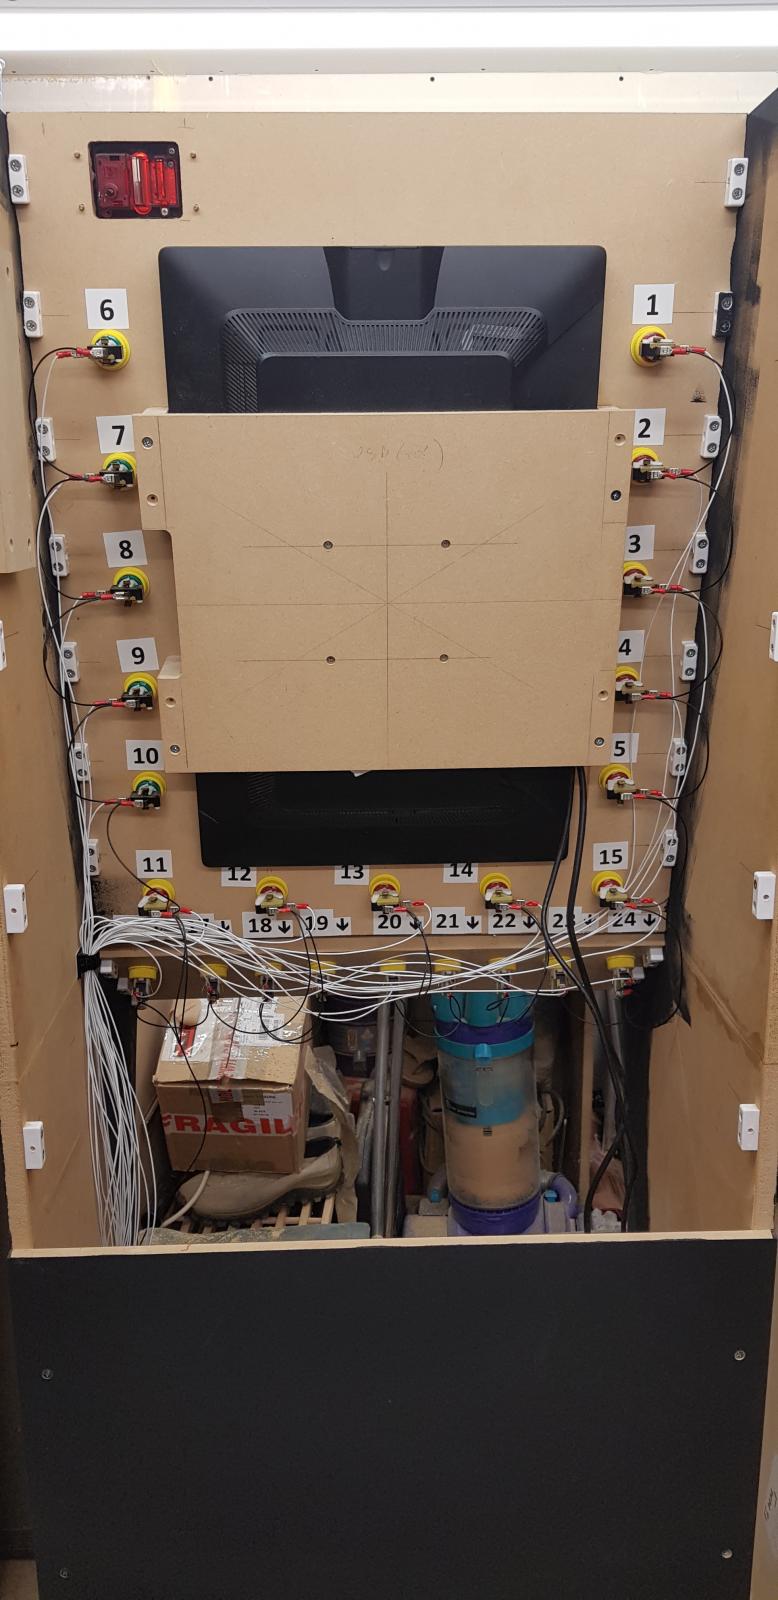
Once all the ends were terminated at the iPac I was left with :

I was then able to test that each button gave the the desired keystroke when pressed.
I have even been able run a test layout and play using the buttons which was great, as I can see some real progress.
I have decided to use the following wire colours Black for Ground, White for Data and Red for Live voltage.
Hope everyone is well and looking forward to the festive period, when hopefully I will get a chance to do some more work on the cabinet.
Pete
Posted by
on 14 December 2018 - 08:46 PM
in
Cabinet Building
Thanks folks,
The Dyson does indeed need to be emptied, I was using it to try and clean up the workshop a bit 
If you saw the rest of the workshop, you'd see that ironically although I like the wiring and things neat I have a nasty habit of using something and then moving onto the next thing, meaning that I end up with piles of tools etc. allover the workbench.
Pete
Posted by
on 10 February 2019 - 10:04 AM
in
Cabinet Building
Hi abispac,
My pacdrives do have outputs off and I also had to get one of them recoded by Andy at Ultimarc so that they were able to run in the same machine (the two I bought both had ID 1. I imagine that you might have an issue without the special using a hopper as until MFME takes the signal and starts to control the pacdrive the output will be on and will therefore attempt to pay coins. I'm sure some more knowledgeable in such matters like Wizard will be along shortly and will point you in the right direction.
Pete
Posted by
on 09 February 2019 - 09:38 PM
in
Cabinet Building
Hi Folks,
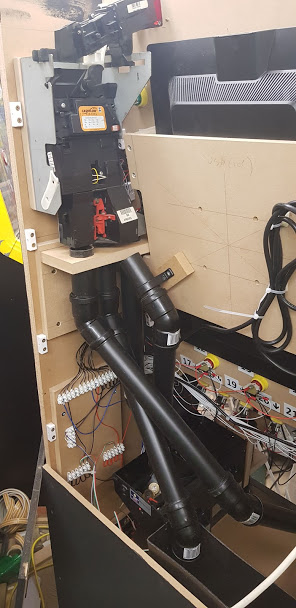
Managed to get routing of coins setup, I have used 40mm Black waste pipe to get the coins from the CF126 into the hoppers and a cashbox. There is also the coins which I am either not allowing (5p) or are rejected which need to be returned to the player via the payout chute. I have come up with:
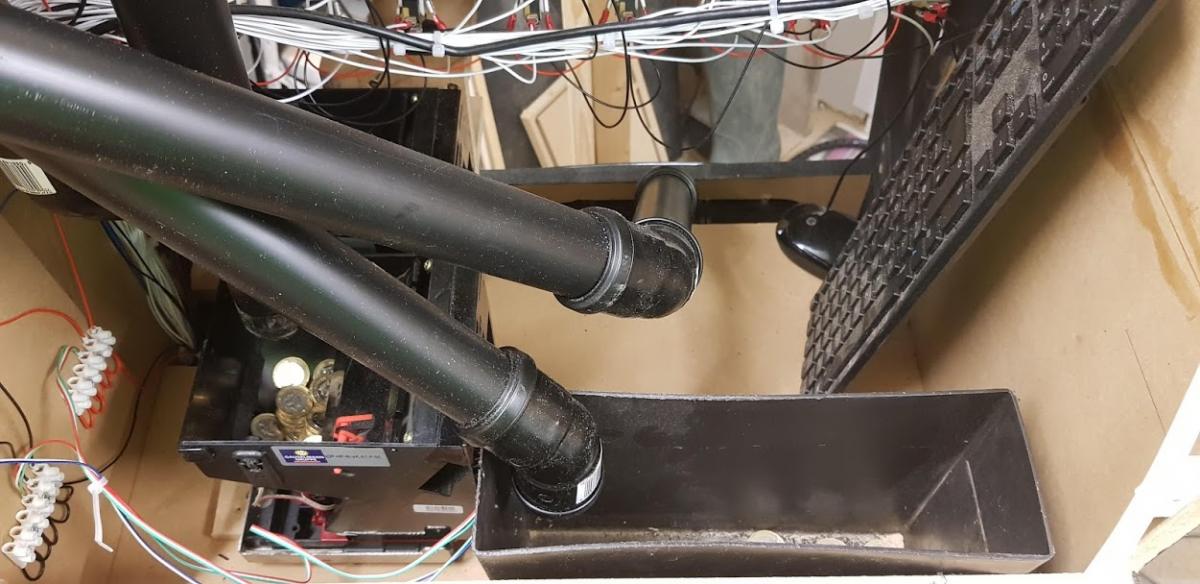
And then with the bottom cover with the payout tray in place:

I have now turned my attention to marking the buttons that I am to use on the layouts, I have copied the approach taken by @uptown47 where a number i placed next to the image of the physical button on the layout:
so this:

becomes this:

and when run inside the emulator:
Just got to do these edits on any layout I want to run inside the cabinet.
Pete
Posted by
on 06 February 2019 - 07:46 PM
in
Cabinet Building
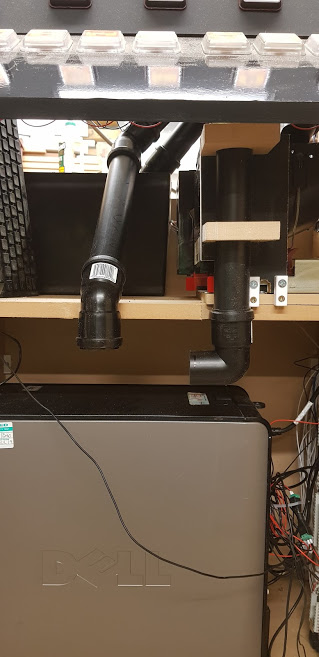
Hi Folks,
Managed to get some more time in the workshop and so turned my attention to my next task which was to get the coin inputs working. however I have actually ended up getting the Hopper's working.
I had purchased a pair of hoppers from eBay, however due to my not checking they turned out to be Serial. I thus started looking again and managed to find a pair of Azkoyen hoppers in Germany and the buyer was happy to ship to the UK.
The previous hoppers did however have the original mounting base with the correct quick release mountings, so I proceeded to use this and mount this on a shelf which I had added just above the PC.
I then proceeded to test the coin output and found that the hoppers were spraying coins in all directions.
Then whilst contemplating the issue and trying to work out how to solve this I had a browse on eBay and noticed that somebody was selling an Payout tray from a Barcrest Horizon cabinet. Having accidentally won a water damaged Barcrest Horizon based machine on eBay (I placed a bid and discussed sizes with the buyer, then the machine sold to somebody else) I then got a message asking if I wanted the cabinet as the buyer had only wanted the MPU cartridge, so I got and entire cabinet for nothing (albeit badly water damaged)
I proceeded to work out how to remove the Payout tray and cut a hole in my front door so I could add the payout tray
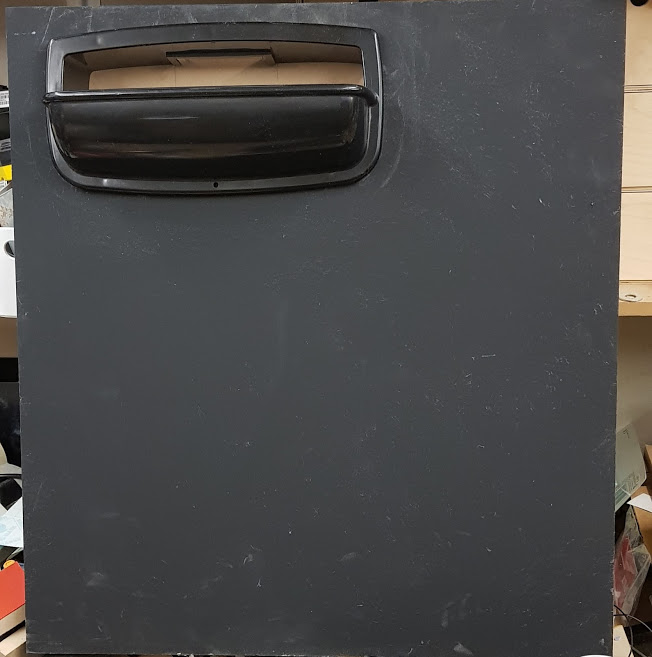

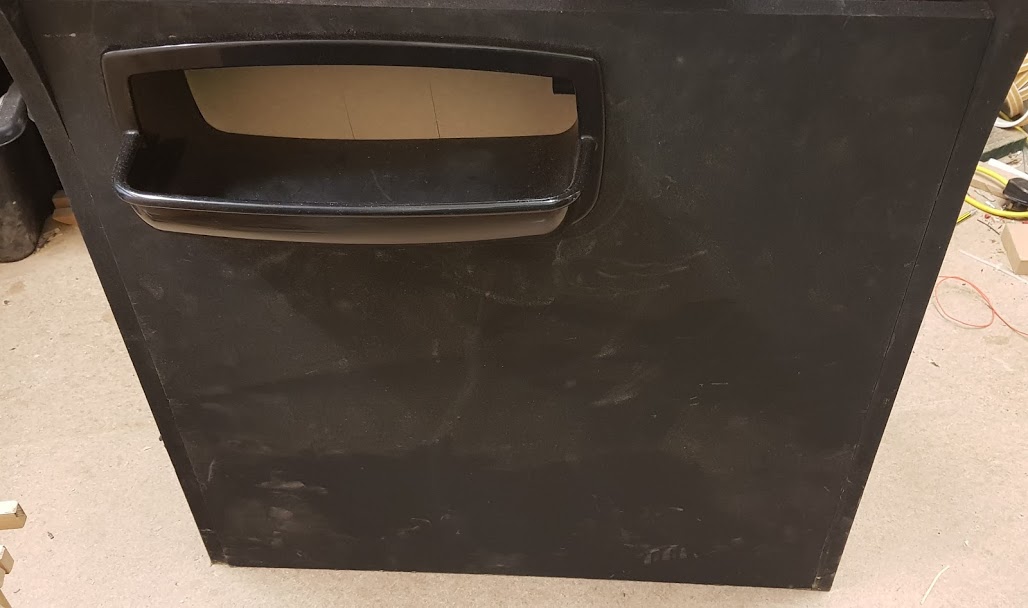
I then proceeded to use a length of 40mm Black waste pipe (which I'm going to use for the coin routing from the coin mech to the hoppers) to make a system to catch the coins and direct them into the payout tray, via a 90 degree elbow
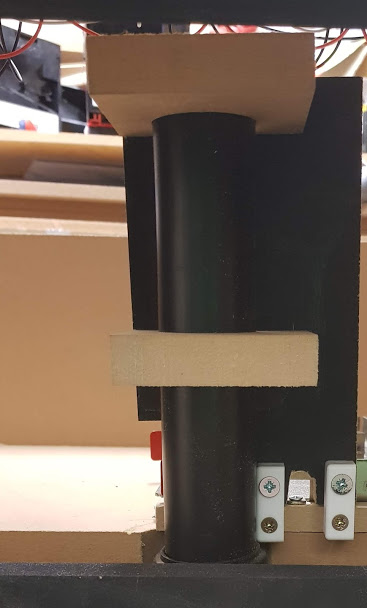
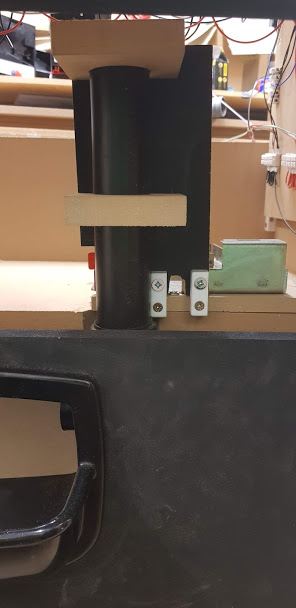
After testing this, the coins in the hoppers (£1 and 10p) all payout and end up in the payout tray, following the excellent advice from Wizard in my post above, an issue I hadn't actually thought about, but why limit myself to only paying out in multiples of 20p.
Next task is to get the coins routed successfully from the Coin mech to the hoppers and coinbox, and also any that are rejected back to the payout tray.
Pete
Posted by
on 02 February 2019 - 02:24 PM
in
Cabinet Building
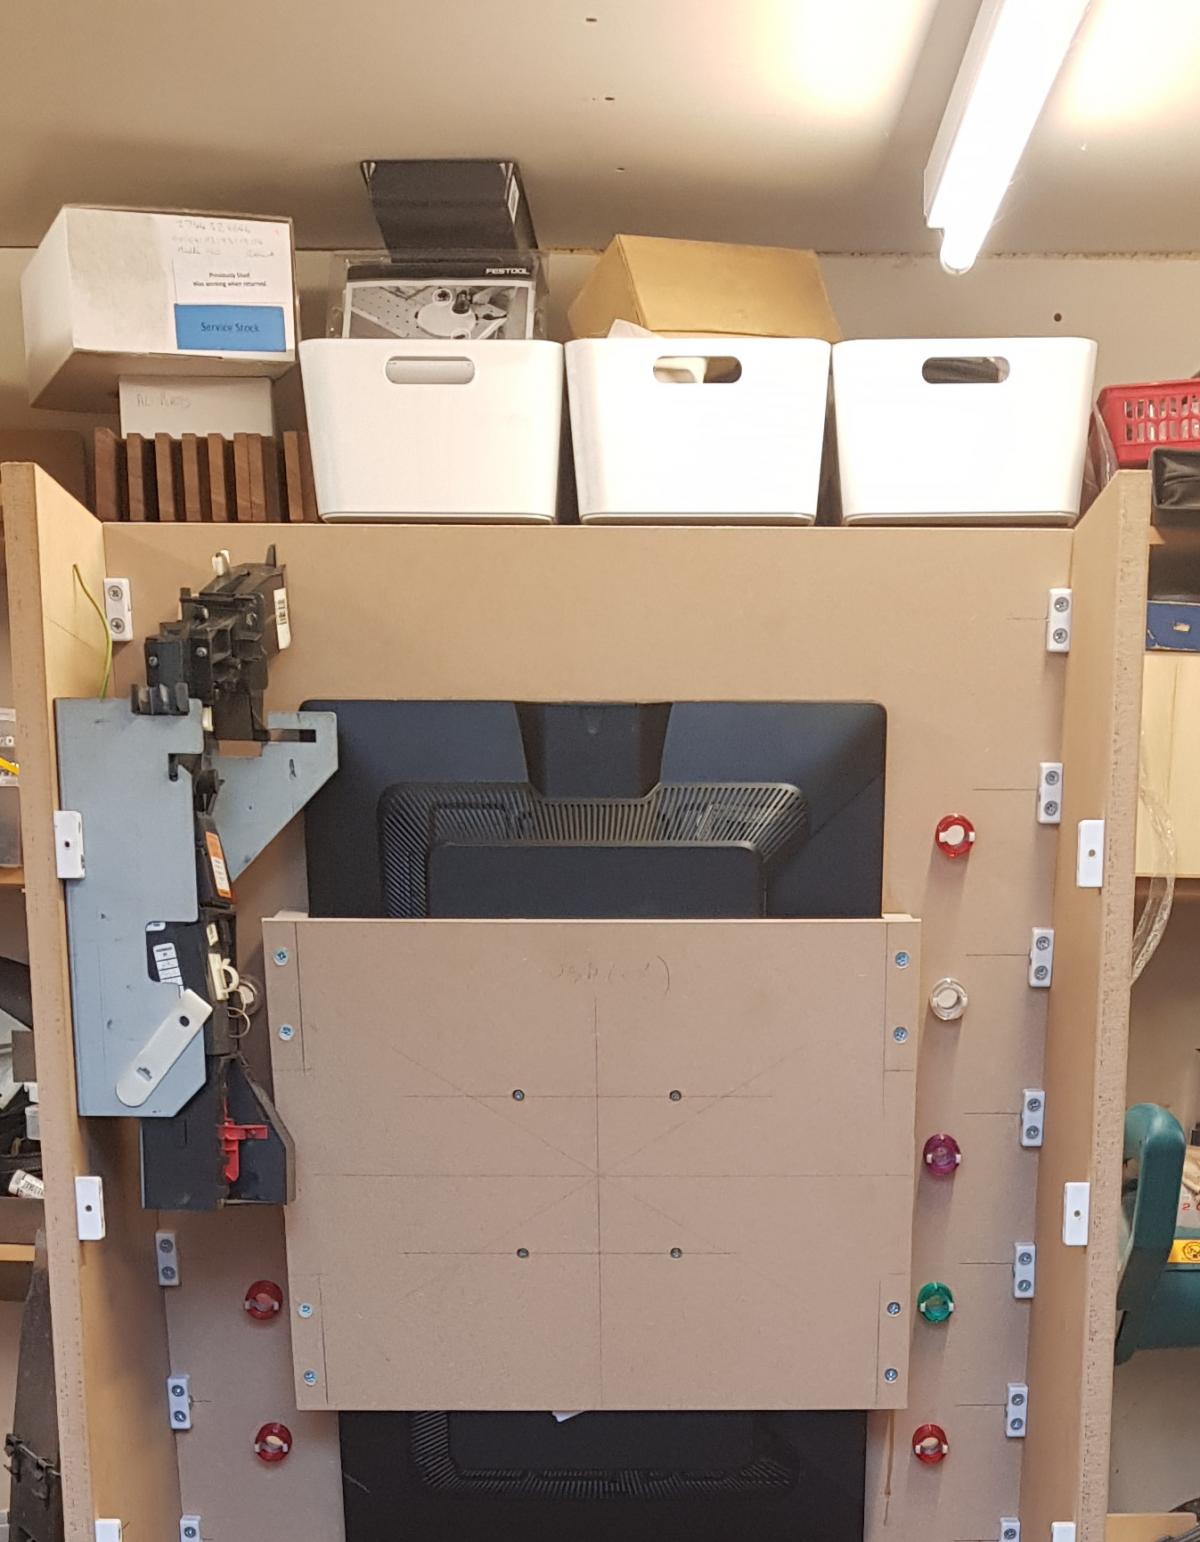
Hello Again Folks,
Apologies for the long delay in an update to this project, however following on from a busy Christmas and a nice does of Flu like symptoms, I then got assigned work projects miles and miles from home resulting in an enforced break from the building of the cabinet, today I have managed to get back into the workshop and make some further progress.
First order of business was to make all the connections for the lamps and wire these back to the iPac boards, one of which had to go away to be re-programmed by Ultimarc. I cannot recommend highly enough the service that I got from Andy, who re-programmed my board for me even though I bought it from a re-seller In future I will be going straight to Andy for any boards I need.
The wiring of the lamps followed a similar colour as the former, with white wires being data/signal and red being the 12v supply.

These were then all fed back to the iPac which resides in the bottom of the cabinet next to the PC.

I then decided that I would test the machine and just see if I could get the buttons to behave as they had on the test board, so after a period of continuity testing for peace of mind I fired up an old favourite or mine and programmed the lamps in MFME, and to my utter surprise everything worked first time. It was great to see the buttons lighting up and really adds to the immersion and feel of playing a 'real fruitmachine'
Next I hope to get the coin inputs working so that credits can be applied via the coin mech, then I will turn my attention to the hoppers for getting payout. I am hoping to get 2 hoppers to work, one for £1 coins and one for 20p coins.
Pete
Posted by
on 17 October 2018 - 08:36 PM
in
Cabinet Building
Hello Again,
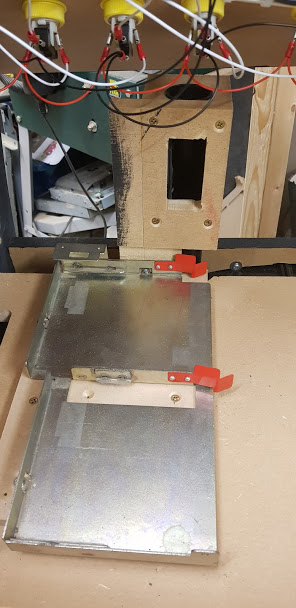
I have had a bit of an issue with fitting the coinmech due to a bit of a measuring oversight, but fortunately I think that I have managed to get away with it and progress on the cabinet can now continue with the wiring and connections of the buttons.
I fitted the coinmech into the back of the cabinet and checked it for position,
fortunately it cleared the monitor (just)

with this in place I created a test piece to make sure that I could get the coin bezel to fit onto the monitor panel.
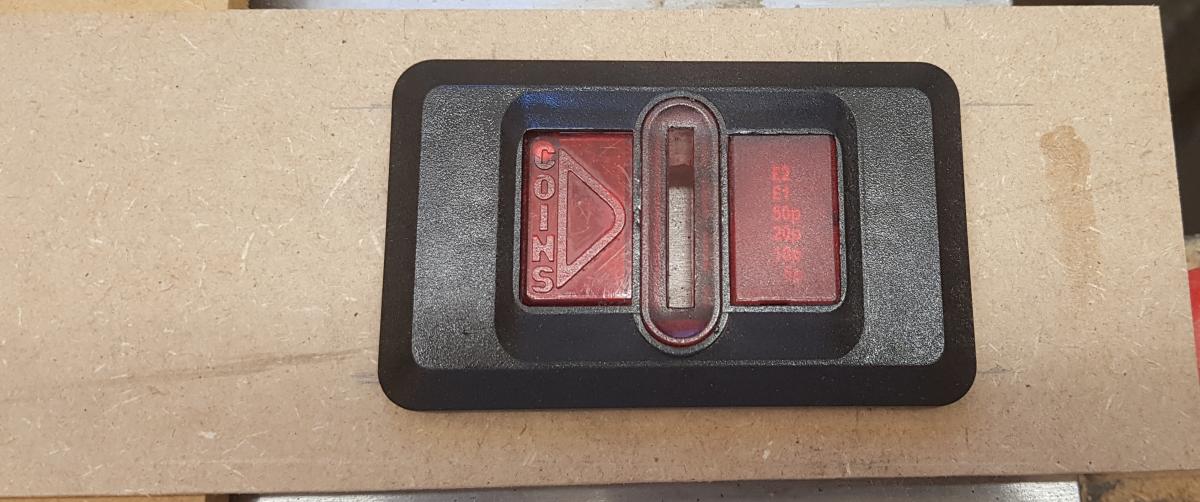
Once that I had this, I was able to use it to create the holes in the monitor panel and mount the coin bezel on the machine.

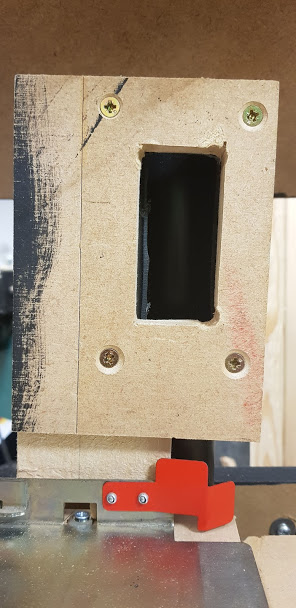
It was all seeming to go well, so then fitted the coinmech into the coinmech holder which I'd fitted back into the machine, when I fitted this back into the machine and tried to feed a coin in, the bezel and the coinmech didn't line up, I was slightly stumped, so I removed the monitor panel and re-fitted the test piece, which lined up perfectly, this was when I realised that I had clamped the test piece onto the outside of the cabinet and lined up the outside edges. thus meaning that the Coin Bezel was too far to the left looking from the front of the cabinet.
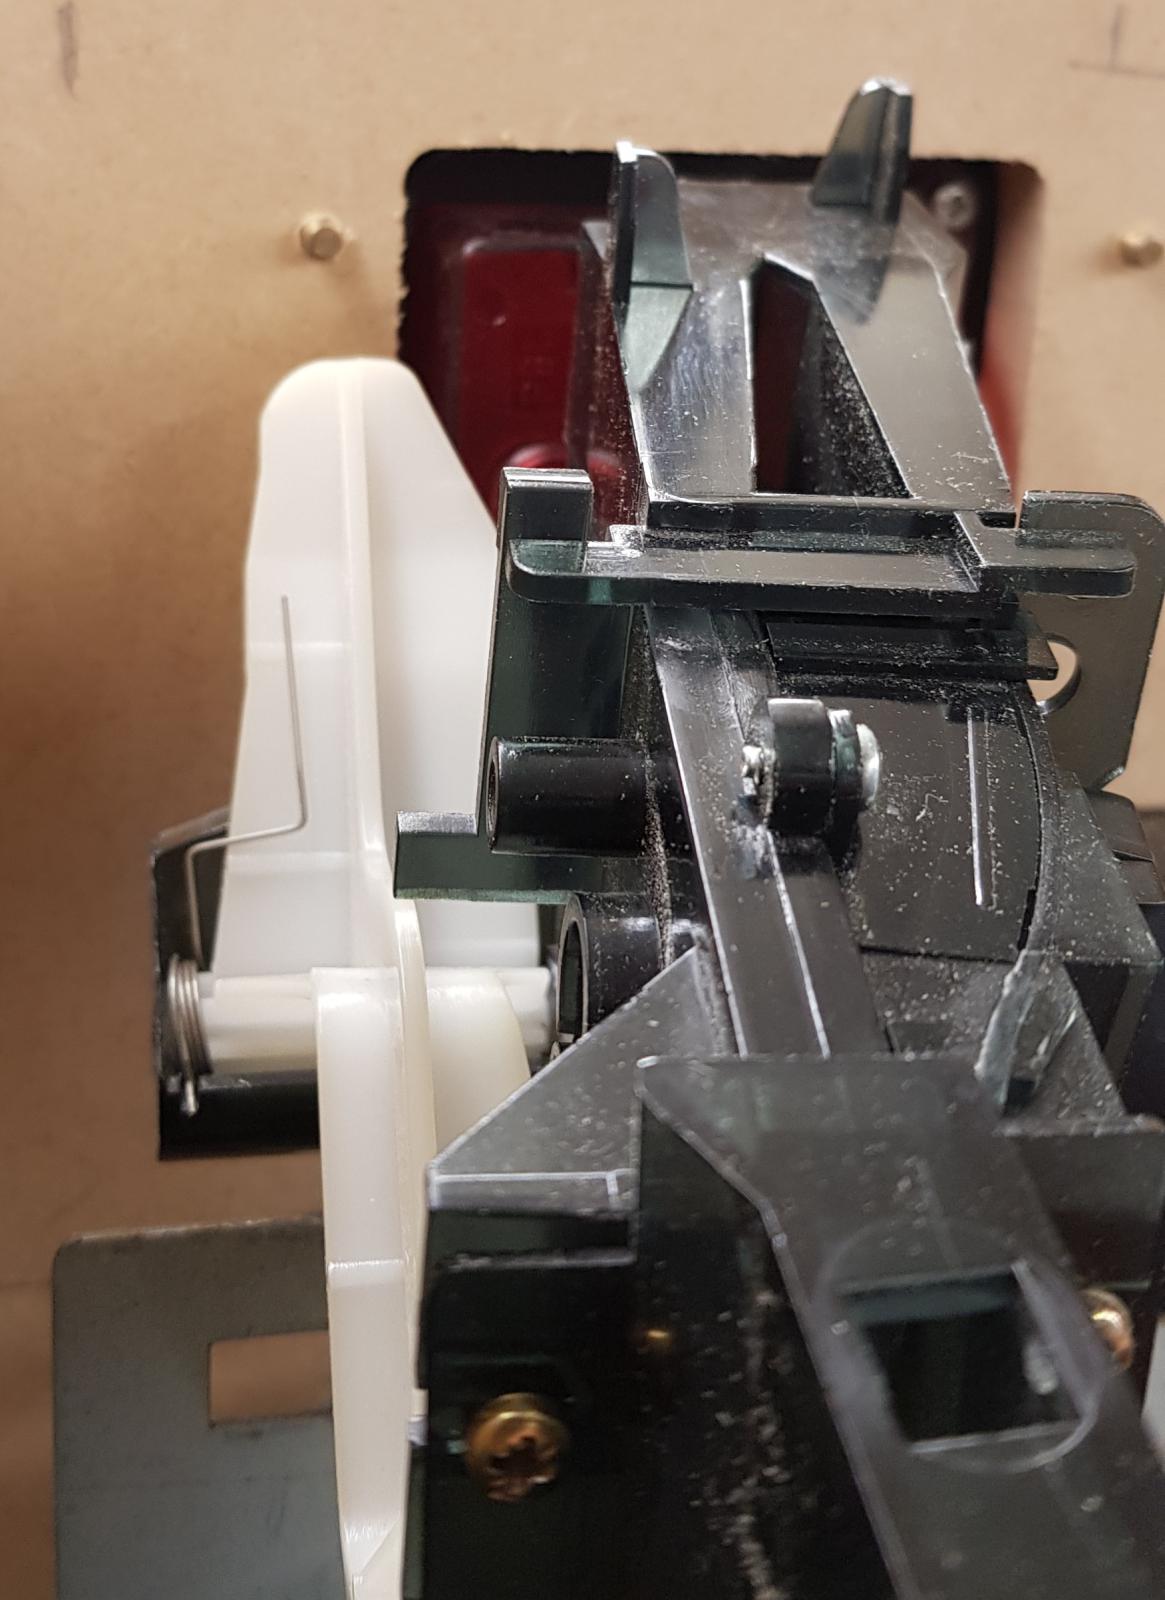
So after a little bit of contemplating and measuring I realised that a piece of the Cabinet MDF fitted behind the coinmech holder would bring everything back in line, however this will mean that the bottom of the coinmech sorter will hit the monitor panel, so I would need to remove a piece from the side of the back of the monitor holder, shown below by the red rectangle.
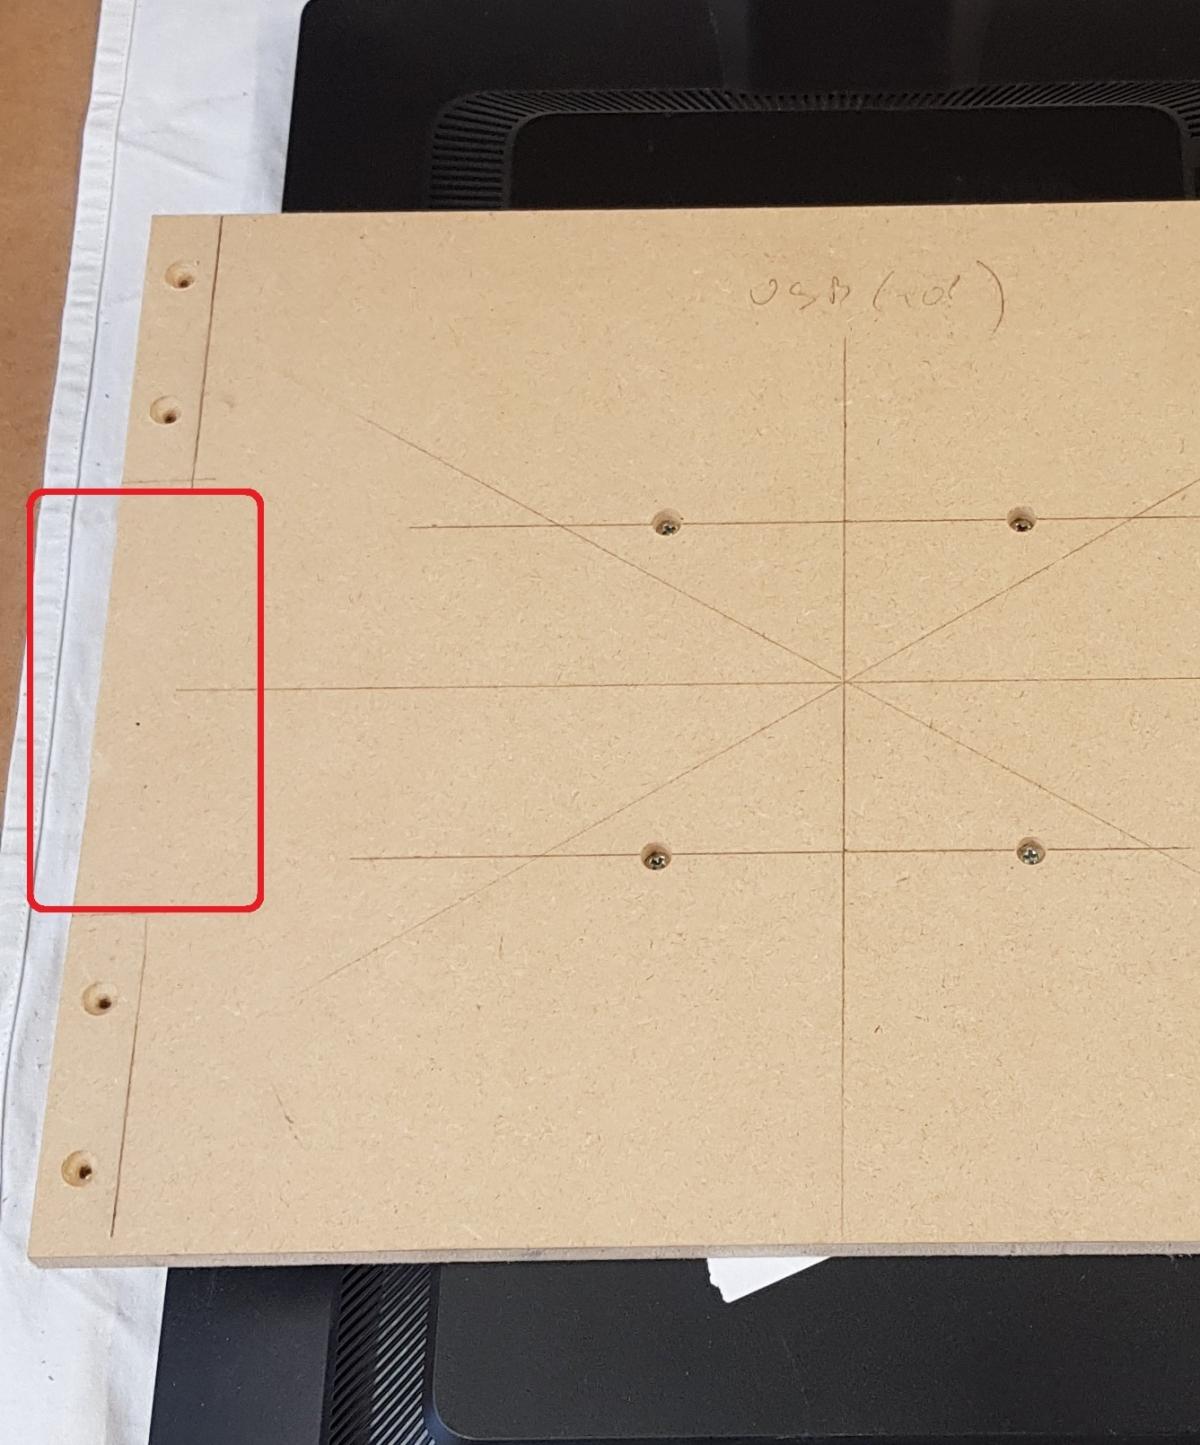
So I cut a piece of MDF and mounted it behind the coinmech holder, thus moving the coinmech the required 18mm and allowing everything to line up.

with this piece of MDF in place and the coinmech mounted everything lined up as can be seen below:
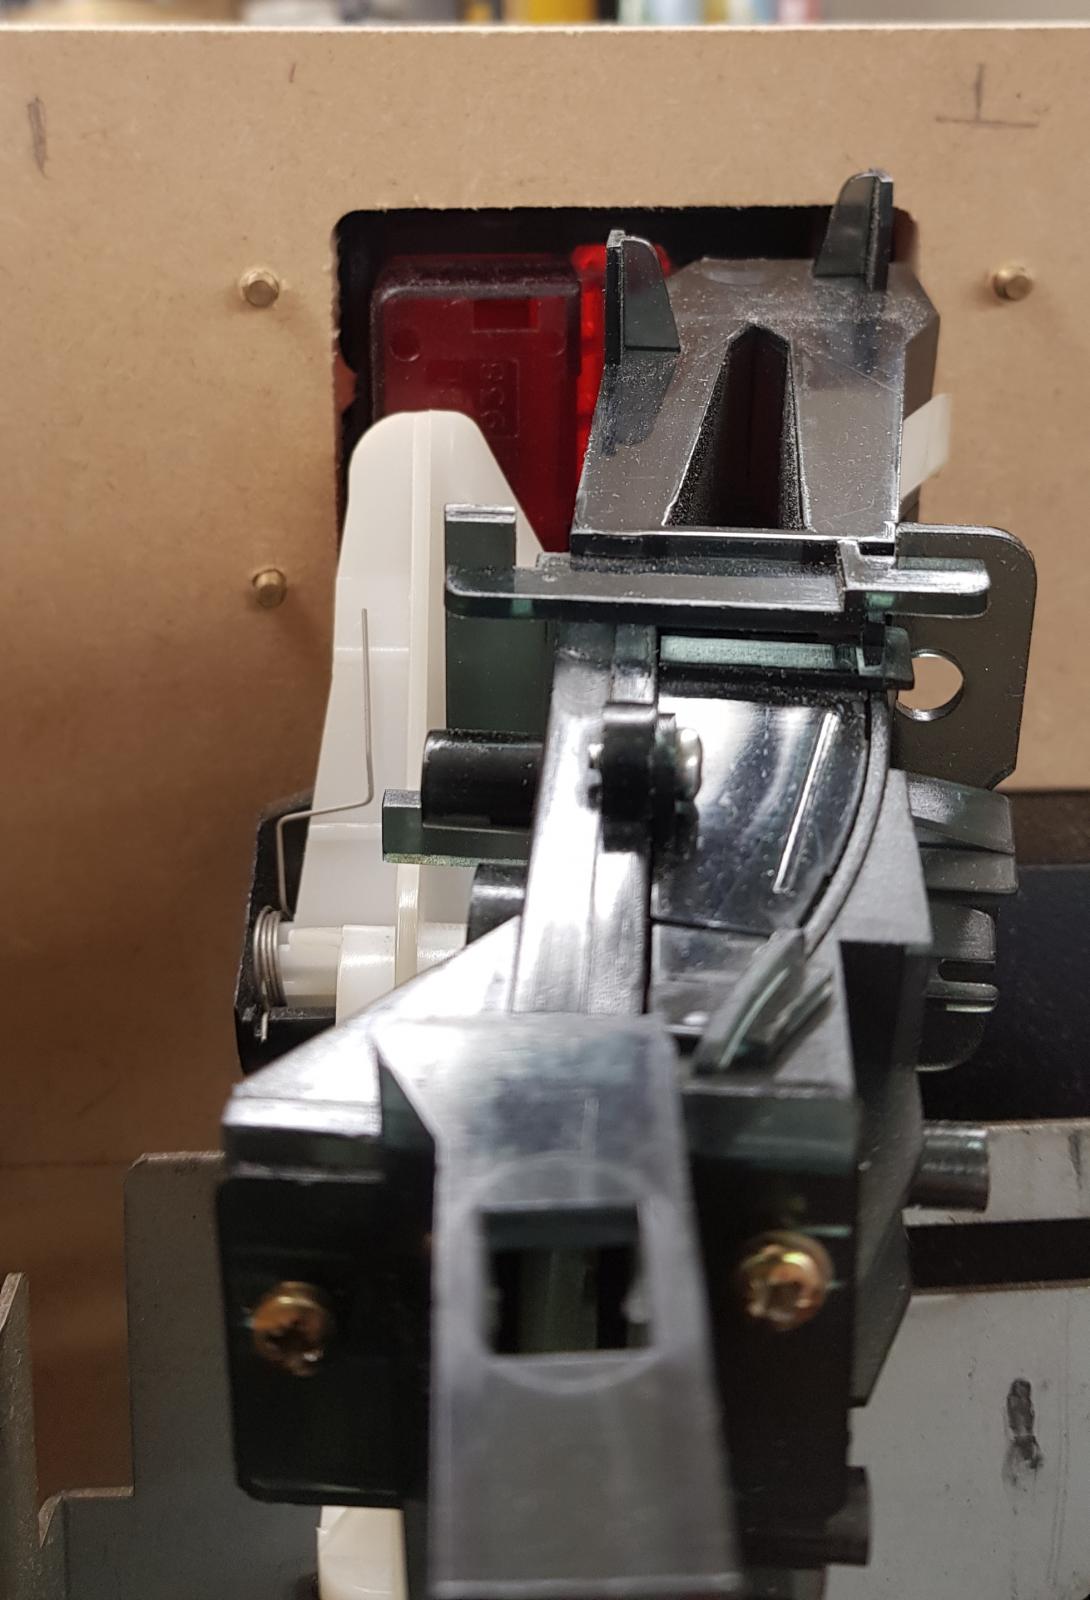
And the piece that I had cut out of the back of the monitor holder was large enough to allow the coin sorter to clear then monitor.

Hope the post isn't to boring for folks.
Next I plan to move onto the wiring and position of the computer, I plan to mount the ipac and pac-drives on a board that will be able to be removed if needed.
Pete
Posted by
on 14 October 2018 - 08:37 PM
in
Cabinet Building
Posted by
on 09 October 2018 - 08:30 PM
in
Cabinet Building
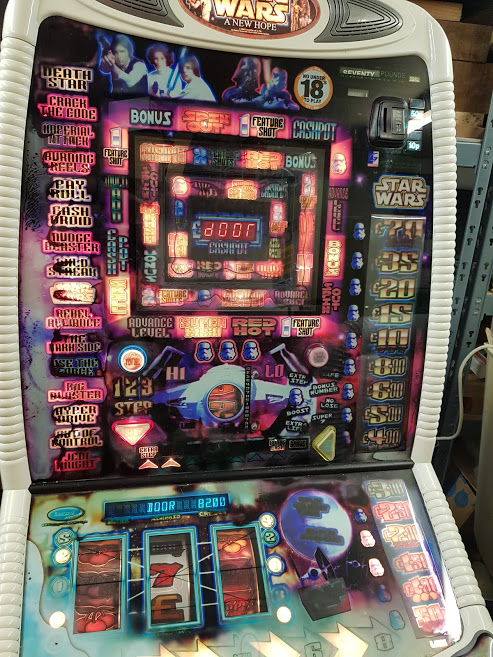
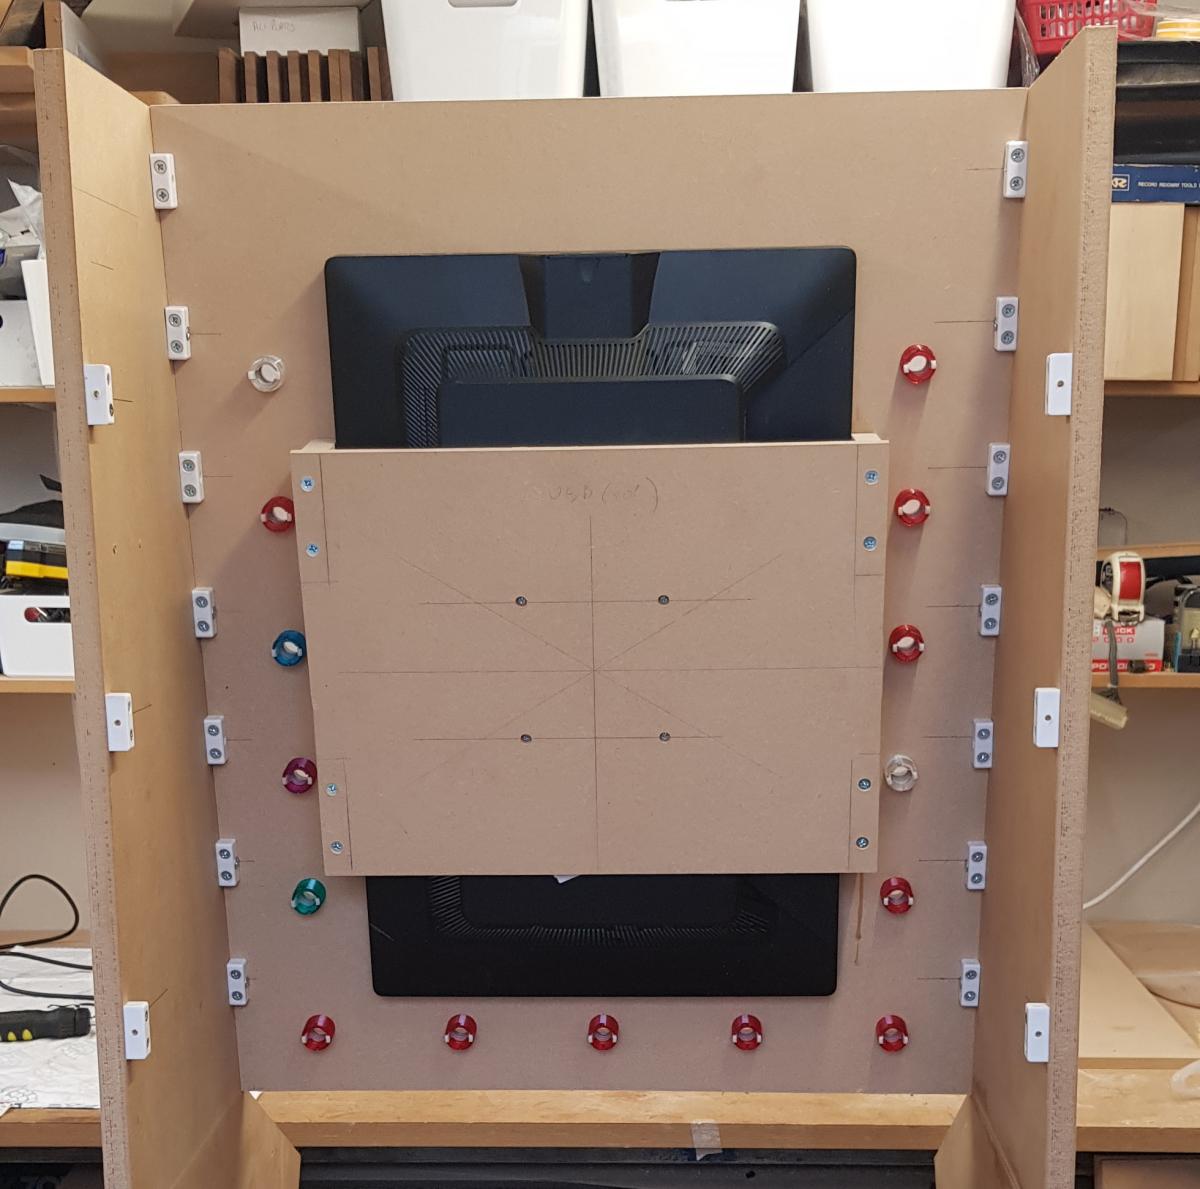
Hi All,
As you may have seen from some of my previous threads I have been collecting the bits to try and build a freestanding MFME cabinet. I have been inspired in this by Uptown and Reg and No1Stoney all of who seem to have made absolutely amazing cabinets. I just hope that my attempt will be playable once it is finished.
This weekend I managed to get some time and cut the sides of the machine, and when glued together they look like:
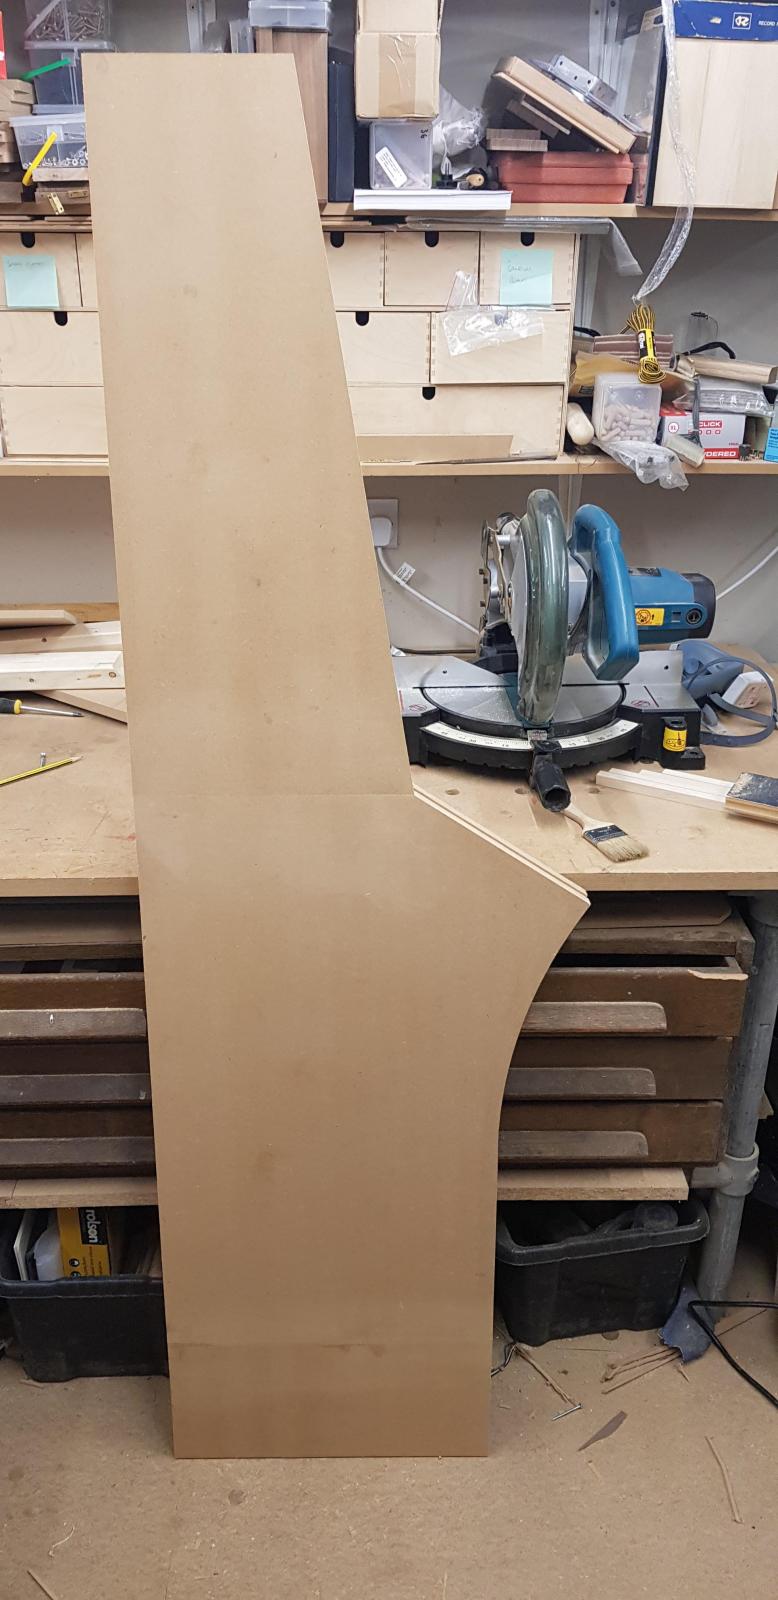
The reason that they are glued and not a single piece is that I do not have the space to handle a single sheet of MDF, so after some testing I have found that I can edge glue them and the result once cured is nigh on impossible to break at the join.
Once these were fully cured (next day) I then started to assemble the cabinet using join blocks so that the various panels can be removed to allow access to the innards.

And once the other side and a base frame were added we have a self supporting basis of a skeleton.
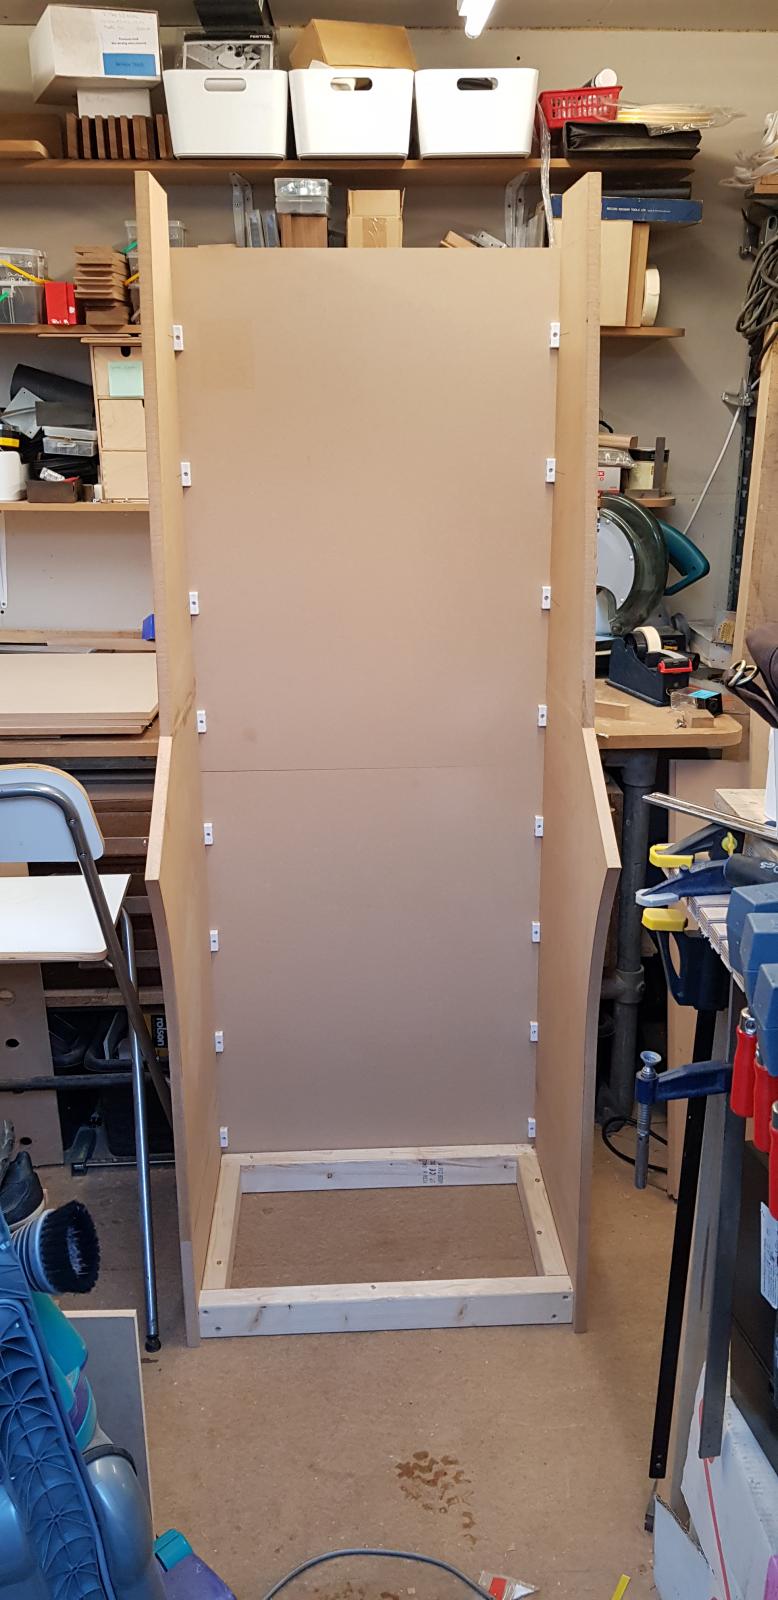
This evening, I have been trying to create a screen mount and get the positioning of the buttons round the screen to a position that I am happy with.
Pete
Posted by
on 11 October 2018 - 09:02 PM
in
Cabinet Building
Posted by
on 14 October 2018 - 06:32 PM
in
Cabinet Building
Hello Again,
Managed to make some further progress on the build today.
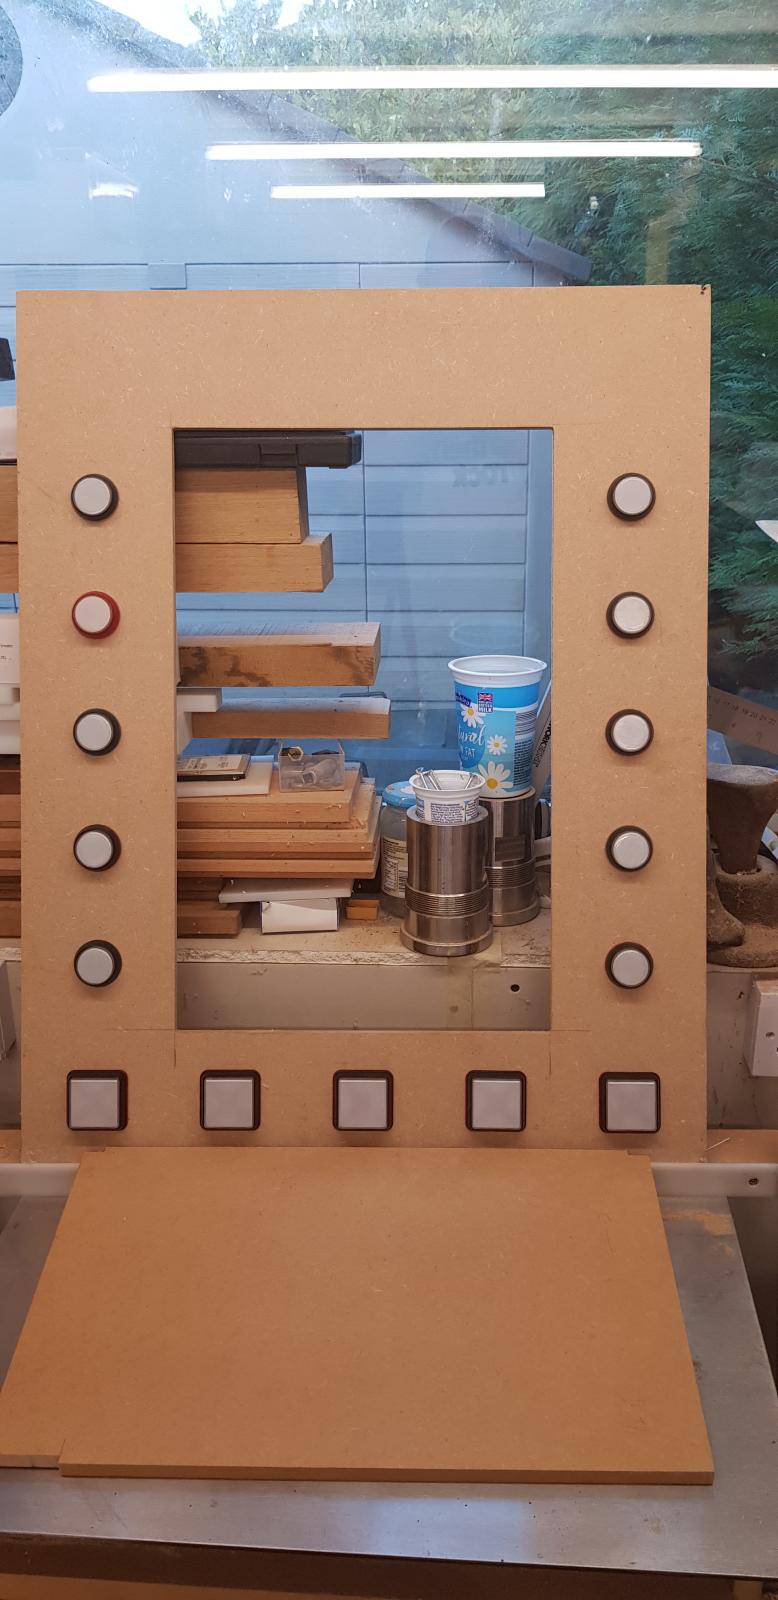
The monitor now has been mounted onto it's panel and the blocks for this to mount on have been put on the back of the front panel.

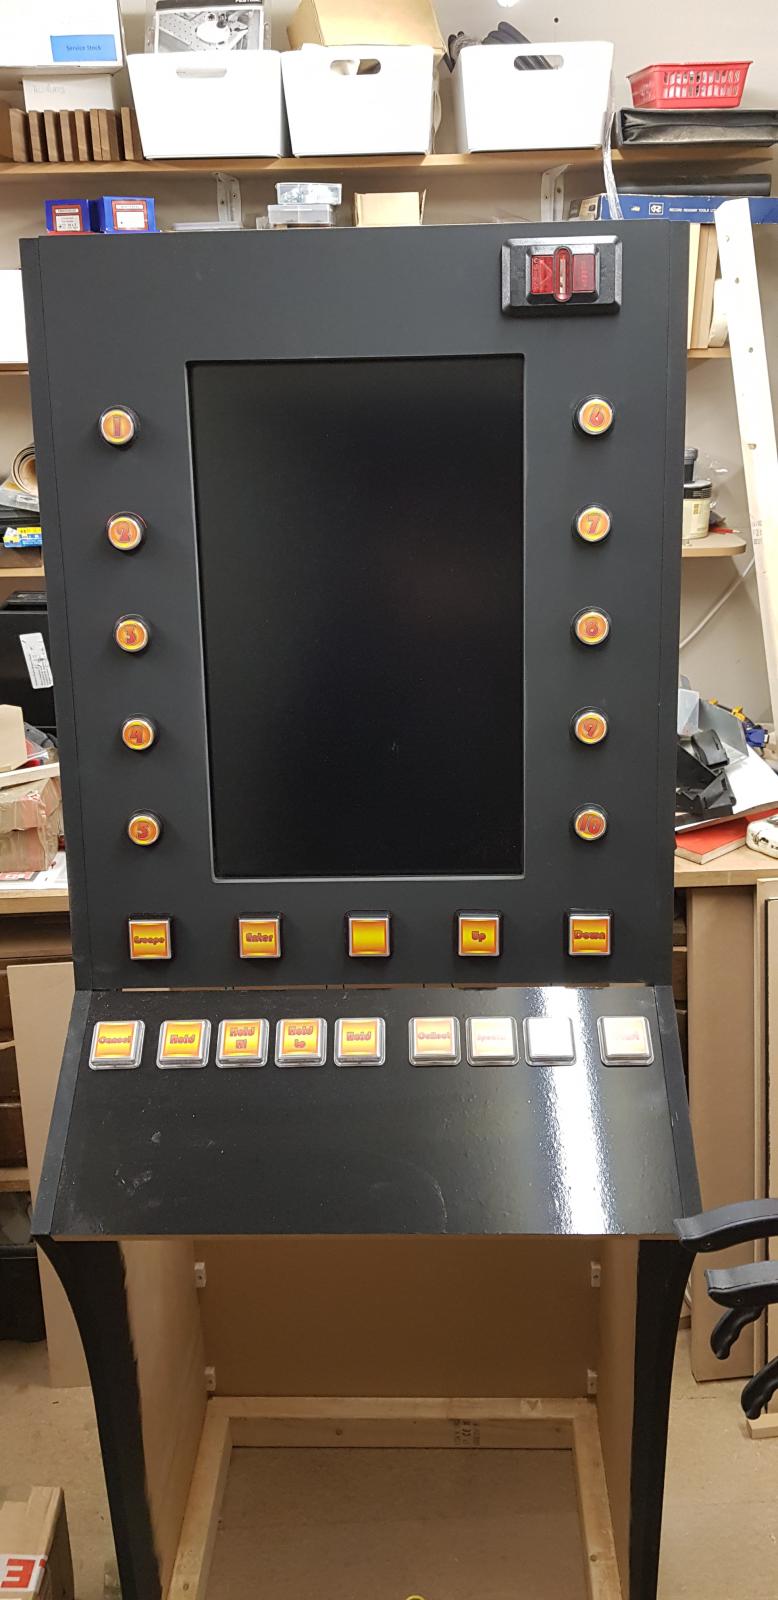
Below is the main panel fitted into the cabinet with the buttons in place. I think that it is going to work quite well and the height and layout feels good.

When the monitor was screwed in place to test I was really pleased with the fit and the space around the sides for access to the buttons for wiring etc.
Next was to look at creating the main button panel for below the monitor, I have added the following fixed buttons on this panel
Cancel, Hold, Hold/Hi, Hold/Lo, Hold (for Club machines), Collect, Exchange, Special (Let's play Barcrest etc) and Start

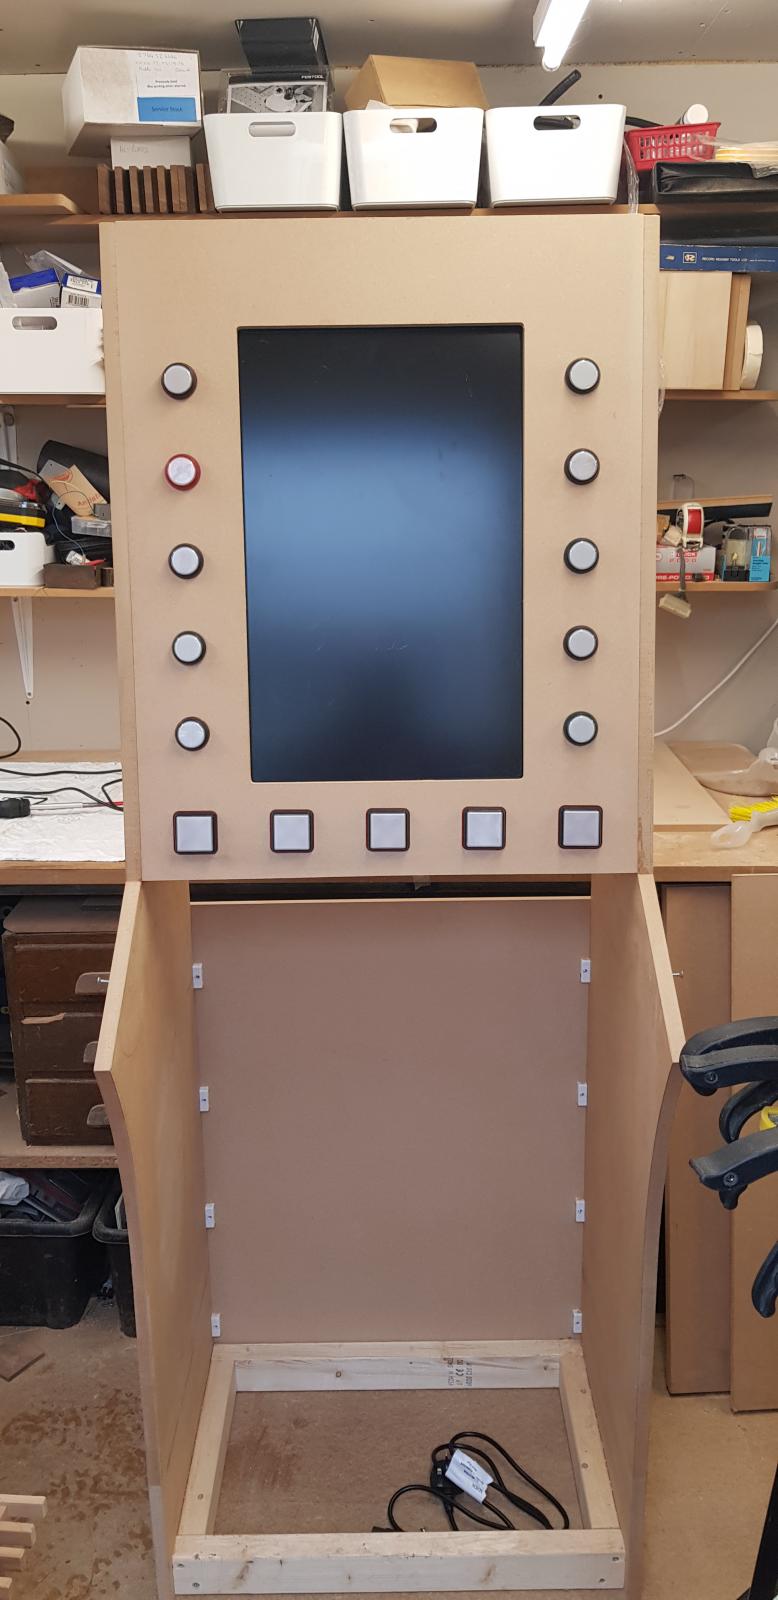
And when the control panel is fitted to the cabinet and with buttons in the holes:

Really starting to get a feel for how it will look, and I have to say I'm really pleased thus far.
Pete
Posted by
on 11 October 2018 - 09:08 AM
in
New Releases
Posted by
on 13 September 2018 - 08:14 AM
in
WIP for MFME5
That is looking great TommyC, I for one wouldn't have the first clue where to start, and I am appreciative of all the talented folks like you, Vec etc (apologies to all who didn't get a mention) who make these amazing DX and classic layouts for us to enjoy.
And lets be honest, you can spend more than a years gold membership on fancy coffee for 3 or 4 people these days!! and people think nothing of that but won't put their hand in their pocket to support the scene.
Pete
Posted by
on 30 September 2018 - 02:15 PM
in
Any Topic Chat
Happy Birthday, hope you have a good un.
Posted by
on 12 August 2018 - 09:09 PM
in
Cabinet Building

Posted by
on 05 August 2018 - 03:10 PM
in
Cabinet Building
Hi Wizard,
Many thanks for your reply, that is great, I will try building that circuit and see how I get on.
I have ordered one of these:
https://www.ebay.co....p-/111646566564
So will see if that works.
Looking forward to more parts arriving.
Pete
Posted by
on 14 August 2018 - 09:14 PM
in
Cabinet Building
Posted by
on 04 August 2018 - 10:40 PM
in
Cabinet Building
Posted by
on 17 September 2018 - 07:26 PM
in
Cabinet Building
Hi Folks,
Finally got some time to have a bit more of a go with the items that I have ordered and I have a strange issue.
I am testing things using the Hulk £25 DX on Scorpion 5 tech as a test bench. I can get the hopper to be recognised and it will pay out, however on multiplier 1 the relay just click and the motor runs for a fraction and then stops. on multiplier 2 I get 3 coins for every 2 that should be paid out. Anybody any idea what I might be doing wrong?
Pete
Posted by
on 18 September 2018 - 03:30 PM
in
Cabinet Building
I suspect that I have rectified the issue with the hopper, as a good clean of the Optical sensor seems to have got this machine working, however MPU5 technology machines will activate the hopper but they do not seem to coin count and I am getting sporadic over payments.
Is there a setting anybody has seen that controls this count?
Pete

